Getting an IPTV subscription with box is way easier than most people think. You plug in the box, connect to the internet, enter your login details and you’re good to go. Parivaar IPTV gives you 8000+ live channels and 15000 VOD titles in HD and 4K so there’s plenty to watch. Read below for the full setup walkthrough and some tips to make it work properly.
Cable bills keep going up every few months and half the channels are stuff nobody in the house ever watches. IPTV is a much smarter way to go especially if you’re an Indian family living in the USA and you want channels from back home plus all the regular English content too.
If this is your first time setting up an IPTV subscription with box it can feel a little confusing at first. Which box do you get? How do you connect everything? What happens after you sign up? These are all normal questions and this guide walks you through all of it.
What Is an IPTV Box and Why Do You Need One?
IPTV stands for Internet Protocol Television. Instead of getting channels through a cable wire or a satellite dish you get them through your internet connection. The content streams directly to your device.
You don’t always need a box to watch IPTV. You can use your phone, your laptop or a smart TV app. But a dedicated IPTV box gives you a much better experience. The picture is cleaner, the buffering is way less and it just feels like proper TV.
A good IPTV box connects to your TV through HDMI, sits on your entertainment unit and works like a regular set top box. Except instead of 200 channels you’re getting thousands.
Picking the Right IPTV Subscription Plans
Before you even think about the box you need to pick a plan. This is where a lot of new users overthink it.
With Parivaar IPTV you get access to over 8000 live channels and more than 15000 video on demand titles. That covers Indian regional channels, Hindi entertainment, news, kids content and a lot of international stuff too. Everything streams in HD and 4K depending on your connection speed.
The IPTV subscription plans are usually broken down by duration. Monthly works if you want to test things out. Longer plans save you money if you already know you’re sticking with it.
Not sure yet? Parivaar IPTV has a 24 hour free trial so you can check things out before spending anything. The free trial gives you real access so you can see the channel quality, the loading speed and how smooth everything runs before making any decision.
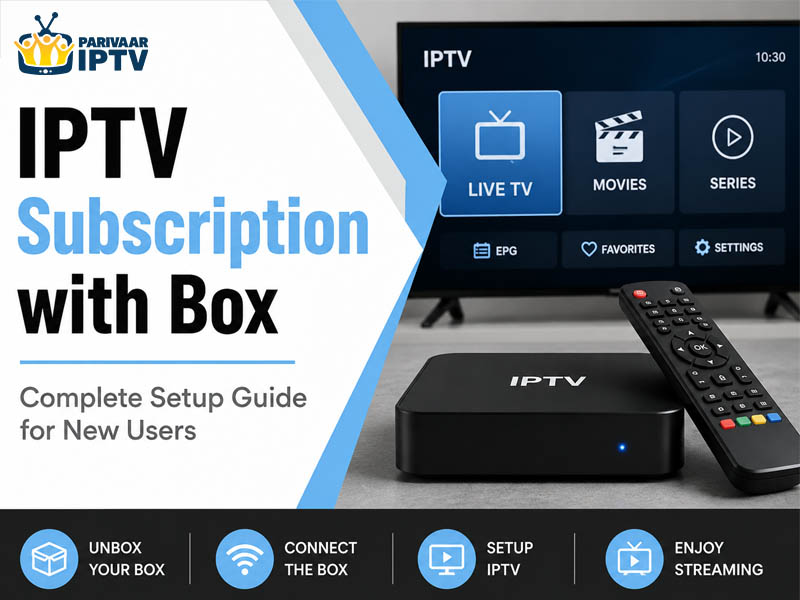
The Full Setup Process: IPTV Subscription with Box
Here’s the actual setup part. It’s really not complicated.
Step 1 – Get your box
You can order an IPTV box through Parivaar IPTV or pick one up separately. Popular options are Android boxes, MAG boxes and Amazon Fire Stick. Android boxes tend to give you the most flexibility because you can install different apps on them.
Step 2 – Connect the box to your TV
Use the HDMI cable to plug the box into your TV. Connect the power. Turn everything on and switch your TV to the right HDMI input. You should see the box home screen come up.
Step 3 – Connect to the internet
WiFi works but ethernet is better for streaming because it’s more stable. For HD and 4K you really want at least 25 Mbps. If your box is far from the router WiFi is fine as long as the signal is decent.
Step 4 – Install the IPTV app
Depending on your box you’ll either have an app already there or you’ll need to download one. TiviMate IPTV Smarters and Perfect Player are the most popular and they all work well.
Step 5 – Enter your subscription details
When you sign up for Parivaar IPTV you get a username password and a playlist URL. You put these into your IPTV app and it pulls up all the channels. Takes less than a minute.
Step 6 – Start watching
That’s it. Channels show up organized by category. You can browse live TV scroll through the VOD library or search for something specific.
Tips to Get the Best Out of It
A few things that actually make a difference once you’re set up.
Use a wired connection when you can – Ethernet is just more reliable than WiFi for streaming. Less buffering less random quality drops.
Restart your box once a week or so – Same as a phone it benefits from a fresh start every now and then.
Check your internet speed first if something buffers – Most buffering problems come from the connection not the service itself.
Set up a favorites list – Most apps let you save channels. Once you know the 20 or 30 you actually watch regularly just save them. Way easier than scrolling 8000 channels every time.
Keep the app updated – IPTV apps push updates occasionally and staying current helps with stability.
Read More – Top Benefits of Using an IPTV Service for Daily Entertainment
Why Parivaar IPTV Works for Indian Families in the USA?
Finding a service that covers everything you want as a desi family in the USA is harder than it should be. Most platforms lean heavy on English content and Indian options either require multiple subscriptions or just aren’t there at all.
Parivaar IPTV covers Hindi channels, regional language options and Bollywood movies, classic shows, kids content in Indian languages and a lot more. All of it in HD and 4K. The IPTV USA audience is big and Parivaar IPTV is set up to serve what that audience actually watches, not just what mainstream platforms decide to offer. And the regular English channels are there too so the whole family is sorted.
Cable really isn’t worth it anymore when you can get 8000 channels and 15000 on demand titles for a fraction of the cost. The setup takes maybe 20 minutes and after that everything just runs. Start with the free trial at Parivaar IPTV and see how it feels before committing to anything.